So you bought a logo, now what?

Your Ultimate Guide to Branding and Design Magic!
Congrats! You’ve got yourself a logo, and that’s a massive step in bringing your branding and design dreams to life. Now that you have it, how do you get the most out of it? Here’s the fun, quirky guide you didn’t know you needed—packed with pro tips to make your logo the star of your branded graphics and website.
1. Get to Know Your Logo Files
First things first: you’ve got those logo files, so let’s get organized! Save the high-res versions (PNGs for web, JPGs for everyday use, and vectors for scaling) in secure places. You’re set to make this logo work across all social platforms and of course your brand website.
PNG vs. JPG: What’s the Difference?
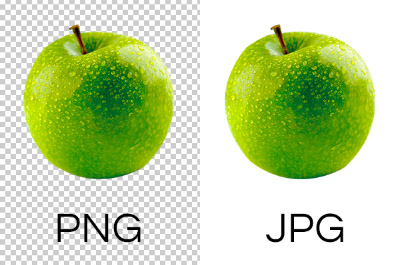
The big difference between PNG and JPG files? PNGs have a transparent background, while JPGs don’t. That’s why PNGs are perfect for logos—they let your design float seamlessly without a background. But if you open a PNG in some programs, it may look checkerboard, white, or black, which just shows it’s transparent.

Another plus: PNGs have lossless compression, so they keep quality better. However, JPGs are widely accepted online. Try using PNGs first, but if it doesn’t work, switch to JPG. Fun fact: JPG and JPEG are the same format, just with different endings—either one works!
File Backup
Your logo files are precious—so back them up, back them up, back them up in multiple places! If you purchase a logo from us, we only keep files for six months, so if you lose them after that, recreating them may cost extra. Here’s what we recommend:
- Download to your computer.
- Save on a USB drive (and keep it with your business records).
- Upload to cloud storage like Google Drive (15GB free) or Dropbox (2GB free).
With copies in these three spots, your logo files are safe and sound!
2. Create a Style Guide
A style guide keeps your branding and design looking sharp and consistent! This document sets rules for color usage, logo placement, and font choices, ensuring every application of your brand stays on point.
Brand Colors
Using the colors from your logo design templates in all of your brand assets creates a cohesive look. Apply these colors across your social media, website, and marketing materials to keep everything in sync. This is especially useful if you want your brand graphics to look sleek and professional.
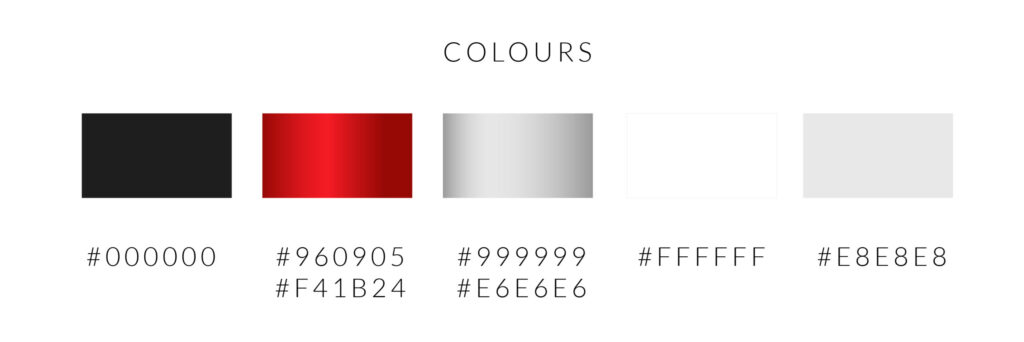
If you purchased a logo from our site or Etsy, you’ll find a file labeled something like “XX_colors.jpg.” This includes color swatches from your logo, each with a HEX code (like #E8E8E8) for easy customization. You can use these codes to match your brand colors on social media or websites. Some sites let you change backgrounds, borders, or text colors—just enter the HEX code provided. If you need the color file but only bought a single logo on Etsy, reach out, and we’ll send it over!
Gradients & Metallic Hex Codes
Some colors in your logo may have two HEX codes because they are part of a gradient, like the red and middle gray. The gradient fades from one color to another, giving you more flexibility in how you use them. You can choose either color for different design elements—like using one for a border or the other for text. Experiment with both to see what fits best, and don’t forget that you can use these HEX codes across your branding for a consistent look.

Branding Fonts
Let’s talk fonts! We often get asked why we don’t provide the fonts used in your logo. The short answer is: legally, we can’t. Designers can’t share third-party fonts. But don’t worry! We include all the font details in the readme PDF, and most of the fonts are free or standard. Some script fonts might require a purchase, so we recommend downloading them right away and saving them along with your logo in your backup locations. This way, you’ll always have them on hand, even if the font source changes!
Once you’ve downloaded the fonts, you can install them easily on both Windows and Mac—just follow the steps below:
- How to install Font on Windows
- How to install Font on Mac/OS X
3. Put Your Logo Everywhere
Next, let’s talk about getting your branding and design out there. Your logo is more than just a pretty icon—it’s a key part of your brand identity! Start with your social media accounts like Facebook, Instagram, Etsy, LinkedIn, Google Maps, and Pinterest. Each platform lets you upload and use your logo in different ways—this is where having multiple versions of your logo comes in handy!
For banners, use the horizontal version; for profile pictures, try out the square or circle versions to see which looks best. Also, remember the difference between PNG and JPG formats: PNG’s transparency can sometimes blend with the background, while JPG often provides contrast if the site background clashes with your logo’s colors.
Experiment to see what works on each platform, as they all vary!
Think of business cards, email signatures, and even packaging as mini billboards for your brand. When used consistently, your logo and branding and design create a memorable, cohesive experience for customers. This is where logo design templates can come in handy, especially if you’re looking to create materials across various formats while saving time.
4. Bring it to Your Website
Your logo’s digital home is on your website, so make sure it shines! Use it in the header, footer, and even as the favicon to make your site feel like your brand’s true online HQ. Plus, adding it to product pages, blog posts, and downloadable content ensures it’s always part of the customer journey.
5. Email Signatures: A Professional Boost
Adding your logo to your email signature is a low-key way to boost your brand visibility. Pair it with a link to your site and maybe a tagline that showcases what makes your branding and design unique.
6. Stay Consistent (But Add Some Fun)
Consistency is key in building recognition, but leave a little room for creativity. Play with seasonal versions of your logo or fresh layouts on social media to keep your brand feeling alive and exciting without losing your brand identity.
With these steps, you’ll take your logo from “just another file” to a dynamic piece of your brand story. Ready to dive into the world of branding and design? Let’s make sure your logo’s journey is as exciting as your brand itself!
More Posts You Might Like…


